Previously, we implemented the gRPC backend service for a simple trading app. If you got this far, you should have a backend with working endpoints for managing stocks, sending orders and retrieving positions.
In this post, we’ll develop the frontend with Remix and TypeScript, using gRPC to communicate with our backend. For a more attractive UI, we’ll use Tailwind with shadcn UI components.
All work in this post will occur within the webapp directory.
Introduction to Remix
Remix is a full stack React framework. It provides a comprehensive solution for client-side rendering, server-side rendering, routing and data fetching. It is an opinionated framework covering the View and Controller aspects of a traditional MVC framework, but remains unopinionated about the Model.
While it is possible to build entire full stack applications with Remix, and talk to a database directly from the server-side code, it may be desirable to use Remix in conjuction with a traditional backend stack in more complex cases.
We will do just that - instead of talking to a database, we’ll proxy requests through to the gRPC service we have written in Rust.
We’ll use nice-grpc, a Node.js gRPC library, to automatically generate TypeScript types for our API layer. Moreover, Remix lets us directly share these types with the frontend, thanks to its full stack features.
A single post can’t cover Remix in detail, but the official tutorial is excellent. If you are unfamiliar with Remix, it’s highly recommended to check it out before proceeding.
The starting repository comes with a set of dependencies for the UI and development. Before proceeding, install the dependencies.
npm installGenerating the gRPC client
Let’s start by adding nice-grpc as a dependency.
npm install nice-grpc protobufjs longnpm install --save-dev grpc-tools ts-protoIn addition to nice-grpc, it installs the necessary tooling to compile
proto files.
Even though we won’t change the gRPC service definitions further, in a real-world scenario, you’d often regenerate the client library to keep up with API changes.
To help with code generation, we’ll create a new file codegen.sh.
#!/bin/sh
mkdir -p app/api/generated
GENERATED_CODE_DIR=./app/api/generatedPROTO_DIR=../api/protos
./node_modules/.bin/grpc_tools_node_protoc \  --plugin=protoc-gen-ts_proto=./node_modules/.bin/protoc-gen-ts_proto \  --ts_proto_out=$GENERATED_CODE_DIR \  --ts_proto_opt=outputServices=nice-grpc,outputServices=generic-definitions,useExactTypes=false,esModuleInterop=true,importSuffix=.js \  --proto_path=$PROTO_DIR \  $PROTO_DIR/*.proto
This script takes the definitions from the API and generates a client
library into ./app/api/generated.
Showing the positions
If you previously used grpcui to interact with the trade service, you may
already have a few positions. Let’s display these in the app!
Fetching the positions
We’ll start by creating a simple wrapper for the API layer to streamline the instantiation of the client with the correct API URL.
import { createChannel, createClient } from 'nice-grpc';
import type { TradeClient } from '~/api/generated/trade';import { TradeDefinition } from '~/api/generated/trade';
let _client: TradeClient;
function getClient(): TradeClient {  if (!_client) {    const address = process.env.API_URL;    if (!address) {      throw new Error('API URL is not set');    }    const channel = createChannel(address);
    _client = createClient(TradeDefinition, channel);  }  return _client;}
export async function allPositions() {  return await getClient().allPositions({});}
We use the .server.ts suffix to tell Remix that this code should
only ever be used on the server. We now have an allPositions function
we can use to fetch the positions.
Before this can be used, we need to set the API URL in a .env file.
API_URL=localhost:8080Displaying the positions
The positions will be displayed in a table in the application. Let’s start
by adding the table component using shadcn.
npx shadcn-ui@latest add tableNext, we’ll add a new loader that will load the positions using the function
we created for fetching positions. In the Index component, we”ll iterate
over the positions and display them in the table.
import { MetaFunction, json } from "@remix-run/node";import { useLoaderData } from "@remix-run/react";
import { allPositions } from "~/api/trade.server";import {  Table,  TableBody,  TableCell,  TableHead,  TableHeader,  TableRow,} from "~/components/ui/table";
export const meta: MetaFunction = () => {  return [    { title: "Positions | Trading App" },    { name: "description", content: "A simple trading app." },  ];};
export const loader = async () => {  const positions = await allPositions();  return json({ ...positions });};
export default function Index() {  const { positions } = useLoaderData<typeof loader>();
  return (    <div className="grid gap-6">      <Table>        <TableHeader>          <TableRow>            <TableHead>Stock</TableHead>            <TableHead>Name</TableHead>            <TableHead>Quantity</TableHead>          </TableRow>        </TableHeader>        <TableBody>          {positions.map((position) => (            <TableRow key={position?.stock?.symbol}>              <TableCell>{position?.stock?.symbol}</TableCell>              <TableCell>{position?.stock?.name}</TableCell>              <TableCell>{position.quantity}</TableCell>            </TableRow>          ))}        </TableBody>      </Table>    </div>  );}
The positions should now appear at http://localhost:3000/.
Sending orders
Now that we can see positions in the UI, let’s make it interactive by adding a form for new orders.
The form component
Our form will require 3 UI components from shadcn - a button to submit the form,
an input field for the quantity, and a select widget for the stock.
Let’s install these:
npx shadcn-ui@latest add buttonnpx shadcn-ui@latest add inputnpx shadcn-ui@latest add selectIn order to validate our form both in the browser and on the server, we’ll use
remix-validated-form with zod. These should already be installed.
import { withZod } from "@remix-validated-form/with-zod";
import { ValidatedForm } from "remix-validated-form";import { z } from "zod";import { zfd } from "zod-form-data";
import { Stock } from "~/api/generated/refdata";import { Side } from "~/api/generated/trade";import { Button } from "~/components/ui/button";import { Input } from "~/components/ui/input";import {  Select,  SelectContent,  SelectGroup,  SelectItem,  SelectLabel,  SelectTrigger,  SelectValue,} from "~/components/ui/select";
interface Props {  stocks: Stock[];}
export const validator = withZod(  z.object({    stockId: zfd.numeric(),    quantity: zfd.numeric(z.number().int()),    side: z.preprocess((v) => parseInt(v as string), z.nativeEnum(Side)),  }));
export function OrderForm({ stocks }: Props) {  return (    <ValidatedForm id="stock-form" method="post" validator={validator}>      <div className="grid gap-2 md:grid-cols-2">        <Select name="stockId">          <SelectTrigger className="w-full">            <SelectValue placeholder="Select a stock" />          </SelectTrigger>          <SelectContent>            <SelectGroup>              <SelectLabel>Stocks</SelectLabel>              {stocks.map((stock) => (                <SelectItem key={stock.id} value={stock.id.toString()}>                  {stock.symbol} ({stock.name})                </SelectItem>              ))}            </SelectGroup>          </SelectContent>        </Select>        <Input type="number" name="quantity" placeholder="Quantity" />
        <Button type="submit" name="side" value={1}>          Buy        </Button>        <Button variant="destructive" type="submit" name="side" value={0}>          Sell        </Button>      </div>    </ValidatedForm>  );}
Note, types like Stock and Side come from the auto-generated code, which
in turn is defined by the Rust service.
Adding the form to the page
The form component expects a list of stocks to populate the stock select component. We can get the list of stocks the same way we got the list of positions.
Let’s define an API wrapper for reference data, refdata.server.ts:
import { createChannel, createClient } from 'nice-grpc';
import type { RefDataClient } from '~/api/generated/refdata';import { RefDataDefinition } from '~/api/generated/refdata';
let _client: RefDataClient;
function getClient(): RefDataClient {  if (!_client) {    const address = process.env.API_URL;    if (!address) {      throw new Error('API URL is not set');    }    const channel = createChannel(address);
    _client = createClient(RefDataDefinition, channel);  }  return _client;}
export async function allStocks() {  return await getClient().allStocks({});}
and extend the loader function to fetch the stocks along with the positions.
With the stocks loaded, we can add the order form above the positions table.
import { MetaFunction, json } from "@remix-run/node";import { useLoaderData } from "@remix-run/react";
import { allStocks } from "~/api/refdata.server";import { allPositions } from "~/api/trade.server";import { OrderForm } from "~/components/order-form";import { Table, TableBody, TableCell, TableHead, TableHeader, TableRow,} from "~/components/ui/table";
export const meta: MetaFunction = () => { return [ { title: "Positions | Trading App" }, { name: "description", content: "A simple trading app." }, ];};
export const loader = async () => { const [positions, stocks] = await Promise.all([allPositions(), allStocks()]); return json({ ...positions, ...stocks });};
export default function Index() { const { positions, stocks } = useLoaderData<typeof loader>();
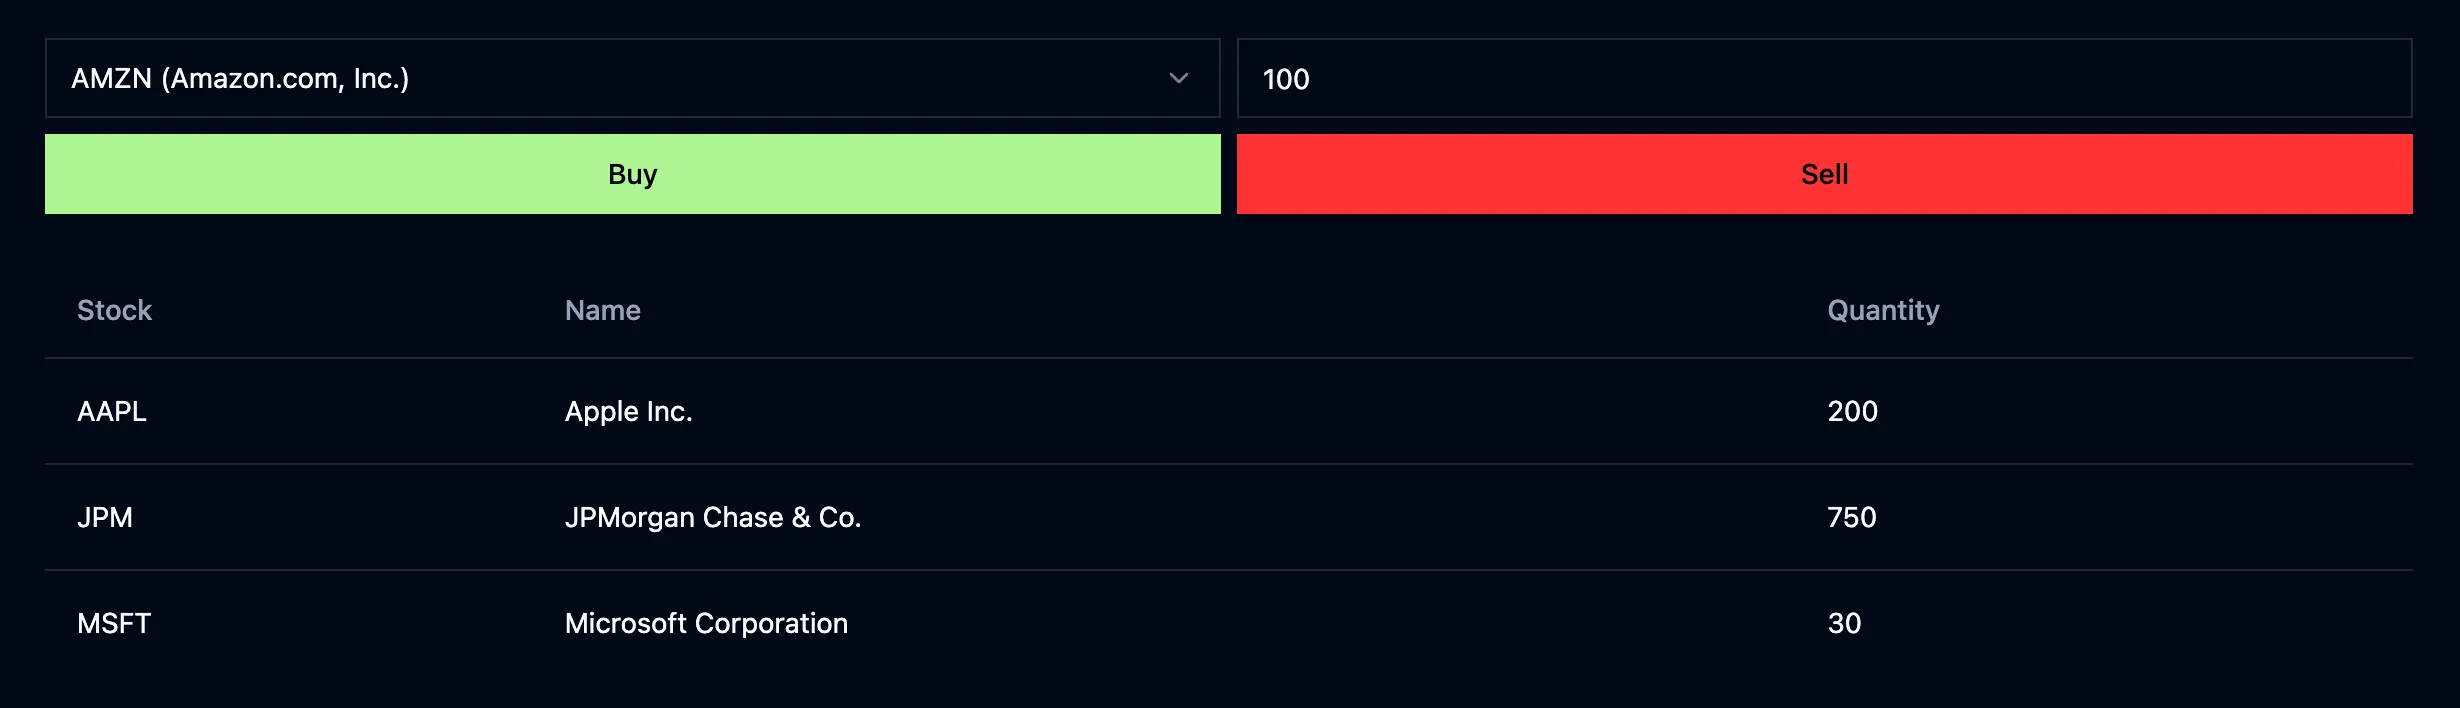
return ( <div className="grid gap-6"> <OrderForm stocks={stocks} /> <Table> <TableHeader> <TableRow> <TableHead>Stock</TableHead> <TableHead>Name</TableHead> <TableHead>Quantity</TableHead> </TableRow> </TableHeader> <TableBody> {positions.map((position) => ( <TableRow key={position?.stock?.symbol}> <TableCell>{position?.stock?.symbol}</TableCell> <TableCell>{position?.stock?.name}</TableCell> <TableCell>{position.quantity}</TableCell> </TableRow> ))} </TableBody> </Table> </div> );}Sending orders
The form should be visible on the main page, but it won’t work just yet.
We need to add a Remix action implementation to handle the POST requests.
However, before we get into that, let’s add a new function to trade.server.ts
for sending orders, which the action handler will be able to make use of.
import { ClientError, createChannel, createClient } from 'nice-grpc';
import type { MarketOrder, TradeClient } from '~/api/generated/trade';import { TradeDefinition } from '~/api/generated/trade';
18 collapsed lines
let _client: TradeClient;
function getClient(): TradeClient { if (!_client) { const address = process.env.API_URL; if (!address) { throw new Error('API URL is not set'); } const channel = createChannel(address);
_client = createClient(TradeDefinition, channel); } return _client;}
export async function allPositions() { return await getClient().allPositions({});}
export async function sendOrder(order: MarketOrder) { try { await getClient().sendOrder(order); return { ok: true, error: undefined }; } catch (err) { if (err instanceof ClientError && err.code === 3) { return { ok: false, error: 'Insufficient position.' }; } throw err; }}This wrapper function also massages the error response when the request fails due to insufficient positions.
Handling form submissions
Let’s create an action handler and call our new sendOrder function
from the handler.
import { ActionFunctionArgs, MetaFunction, json } from "@remix-run/node";import { useActionData, useLoaderData } from "@remix-run/react";
import { validationError } from "remix-validated-form";
import { allStocks } from "~/api/refdata.server";import { allPositions, sendOrder } from "~/api/trade.server";import { OrderForm, validator as orderValidator,} from "~/components/order-form";import { Alert, AlertDescription, AlertTitle } from "~/components/ui/alert";20 collapsed lines
import { Table, TableBody, TableCell, TableHead, TableHeader, TableRow,} from "~/components/ui/table";
export const meta: MetaFunction = () => { return [ { title: "Positions | Trading App" }, { name: "description", content: "A simple trading app." }, ];};
export const loader = async () => { const [positions, stocks] = await Promise.all([allPositions(), allStocks()]); return json({ ...positions, ...stocks });};
export async function action({ request }: ActionFunctionArgs) { const { data, error } = await orderValidator.validate( await request.formData() );
if (error) { return validationError(error); }
const { error: apiError } = await sendOrder({ ...data }); return json({ ok: true, error: apiError }, { status: error ? 400 : 200 });}
export default function Index() { const { positions, stocks } = useLoaderData<typeof loader>(); const data = useActionData<typeof action>();
return ( <div className="grid gap-6"> <OrderForm stocks={stocks} /> {data && "error" in data && ( <Alert variant="destructive"> <AlertTitle>Oops!</AlertTitle> <AlertDescription>{data.error}</AlertDescription> </Alert> )}18 collapsed lines
<Table> <TableHeader> <TableRow> <TableHead>Stock</TableHead> <TableHead>Name</TableHead> <TableHead>Quantity</TableHead> </TableRow> </TableHeader> <TableBody> {positions.map((position) => ( <TableRow key={position?.stock?.symbol}> <TableCell>{position?.stock?.symbol}</TableCell> <TableCell>{position?.stock?.name}</TableCell> <TableCell>{position.quantity}</TableCell> </TableRow> ))} </TableBody> </Table> </div> );}We have also added some rudimentary error reporting to the UI. This reports issues with insufficient positions to the user.
Conclusion
This was the final post in the series. We have finished a simple, but intentionally a little over-engineered, trading app.
The business logic was implemented in Rust, with the persistence layer built on top of Postgres. Type compatibility between the Postgres schema and Rust code was enforced through the use of SQLx. The service layer was built using tonic, a gRPC library for Rust. Using tonic, the Rust types are auto-generated from protobuf files. Rust’s strict compiler ensures that the types between our business layer and API layer are consistent.
We implemented our frontend using Remix with TypeScript. The Remix service talks to the Rust service using gRPC. The TypeScript types were auto-generated from the proto type definitions provided by the Rust service. These types were shared between the client-side and server-side code in the Remix app. We even used zod to validate our forms against the auto-generated types.
With this approach, we ensured type consistency from the Postgres database all the way to the frontend views. Whilst this application may come across as a contrived example, the type safety provided by this stack (and similar stacks - variations include code generation through OpenAPI or GraphQL) starts to shine and add real value in larger projects.
The resulting code can be found in the v4-remix-app branch on GitHub.

David Steiner
I'm a software engineer and architect focusing on performant cloud-native distributed systems.